I am a pretty big fan of Line 6 gear. Their modeling has gotten better and better over the years. I started with a PodXT many years ago and now have their flagship HD500 which I am very happy with and hope to post a future article on sometime soon. In the meantime, this little post will hopefully help someone else who like me has wasted several hours trying to figure out how to get their TonePort to work again.
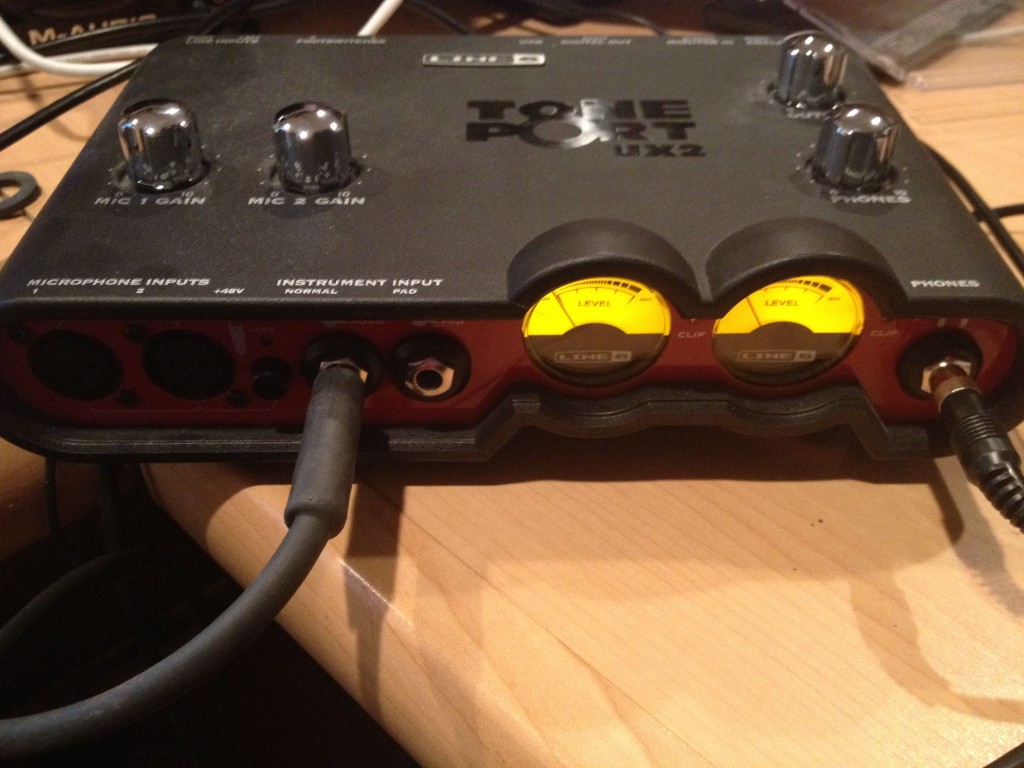
To keep this story from being too long, I got the TonePort UX2 – which is a nice computer recording interface/tone box for Christmas from my wife several years ago. It is really a marvelous little box offering very good sounds for both guitar, vocals and bass. I love the thing but it has brought some headaches along the way. I used to use it with a Mac Book Pro which worked well but was a pain to always disconnect the wires as I needed to move the machine around quite a bit. In August, I got my dream computer – a 27 iMac and couldnt wait to get my magical little TonePort running against it to do some recording. It has been months since then and I had never really gotten it to work with my new computer. It was running briefly a couple of weeks ago but then last weekend started just blinking the red clip lights back and forth. I had tried reinstalling drivers, using their license manager, etc. but nothing worked. Just blinking red clip lights! UGH!
This week, I need to practice a TSO song to play next weekend and I really need this box to run again. Tonight I decided to spend some time to solve the problem and I am happy to say I think I found the root cause. My theory – which was kind of echoed by one of Line 6s support forum posts is that the Mac Migration Assistant that I used when I migrated my files from the MBP to the iMac brought along some extra garbage with it. Thus my attempts to reinstall the drivers were silently failing. The Line 6 uninstall tool apparently doesn’t always work and in this case completely failed. It acted like the old drivers were removed but they were not!
Bottom line – you need to completely eradicate those drivers from your system and reboot before you can use your TonePort again. Though this is specific to my circumstances (a UX2 migrating from one mac to another mac, I would expect this to apply generally to any TonePort on any machine. Perhaps the uninstaller is more reliable on a PC. If you know, please chime in on the comments below.
I’m guessing the uninstaller failed because the Line 6 tools, drivers, etc are spread across so many different directories. Below are the steps I took to remove the old drivers. I noticed on some other posts in the Line 6 forums that some folks were having success by removing EVERYTHING tied to Line 6 on your computer. That is the approach I took and it did work but realize that I lost all of my custom tones in the process for all of my Line 6 gear that were saved on my mac. In my case, everything is backed up via Time Machine so no big deal, but before you continue make sure you understand the risks and make sure you have things backed up!
I removed all of the files directly via the terminal. Please be careful when doing this and understand that if you accidentally delete the wrong libraries or other system files you will have more problems than you started with. Do not do any of this without a backup. If you have any doubts in your ability, I suggest you contact Line 6 and request a better Uninstaller app that actually works.
BE VERY CAREFUL DELETING FILES IN THESE DIRECTORIES. ONE BAD MOVE AND YOU WILL REALLY HOSE SOMETHING UP! ONLY DELETE THE LINE 6 stuff and NOTHING else!
Here is what I removed.
- /Library/Audio/MIDI Drivers/Line6*
- /Library/Audio/Midi Devices/Line 6
- /Library/Audio/Plug-Ins/VST/Line 6
- /Library/Audio/Plug-ins/Components/POD*
- /Library/Frameworks/L6TWX*
- /Library/Application Support/Line 6
- /Applications/Line6
- ~/Library/Preferences/*line6* – only files with line 6 in the middle of the name
There was a forum post at Line 6 that also going to /private/var/db/receipts and running sudo rm -i com.line6*
Once you have eradicated everything Line 6 on your machine, reinstall the latest Line 6 Monkey software – this is their main hub for installing everything else
Now verify that the Line 6 license manager is installed and run it. I made sure that both the iMac AND the Tone Port are listed. You may have to rescan devices after licensing your computer to find the Tone Port
Install and fire up Pod Farm 2 and play!
Remaining Issues
Things are still not perfect yet! I used to use GearBox as my main app to access the goodness of this little box. Now, GearBox appears to be outdated and replaced by Pod Farm 2. Well that is fine except us old timers don’t have software licenses that fully supports PF2! Reinstalling GearBox today is not an optimum solution since the link from the Monkey refers to GearBox in an outdated complete package. i.e. it is a link to a big archive that includes outdated drivers, outdated Monkey, and GearBox. Not sure why they bundled it but I sure dont want to have to go thru all of this again. I have issued a support ticket with Line 6 and am awaiting their response. Hopefully us long term Tone Port users can get grandfathered in!
Update 12/13/11 –
Heard response back on my support ticket today copied here for anyone interested:
The POD Farm 2 license is built into the newer POD Studio devices by design. All owners of previous generation Toneport hardware are not ‘grandfathered’ in to get a free POD Farm 2 license. This is not a feature of the device that you purchased, so if you want to use the POD Farm 2 software the license must be purchased. You CAN use the POD Farm 1.12 software for free which will provide you all of the models that you get with the basic model set of the Toneport UX2:
I am not terribly thrilled with this response. Basically it sucks if you are an early adopter into the TonePort family of products. If you want to use it and have the same features and sounds as the folks buying the same hardware today, you need to pay them an extra $99 for that privilege. I suggested in my reply that they take some of the profits from the folks that agree to this to devote time to fix their broken device uninstaller. The problems with that uninstaller are the reason this post was written.